Monday 3 October 2011

So much excitement!


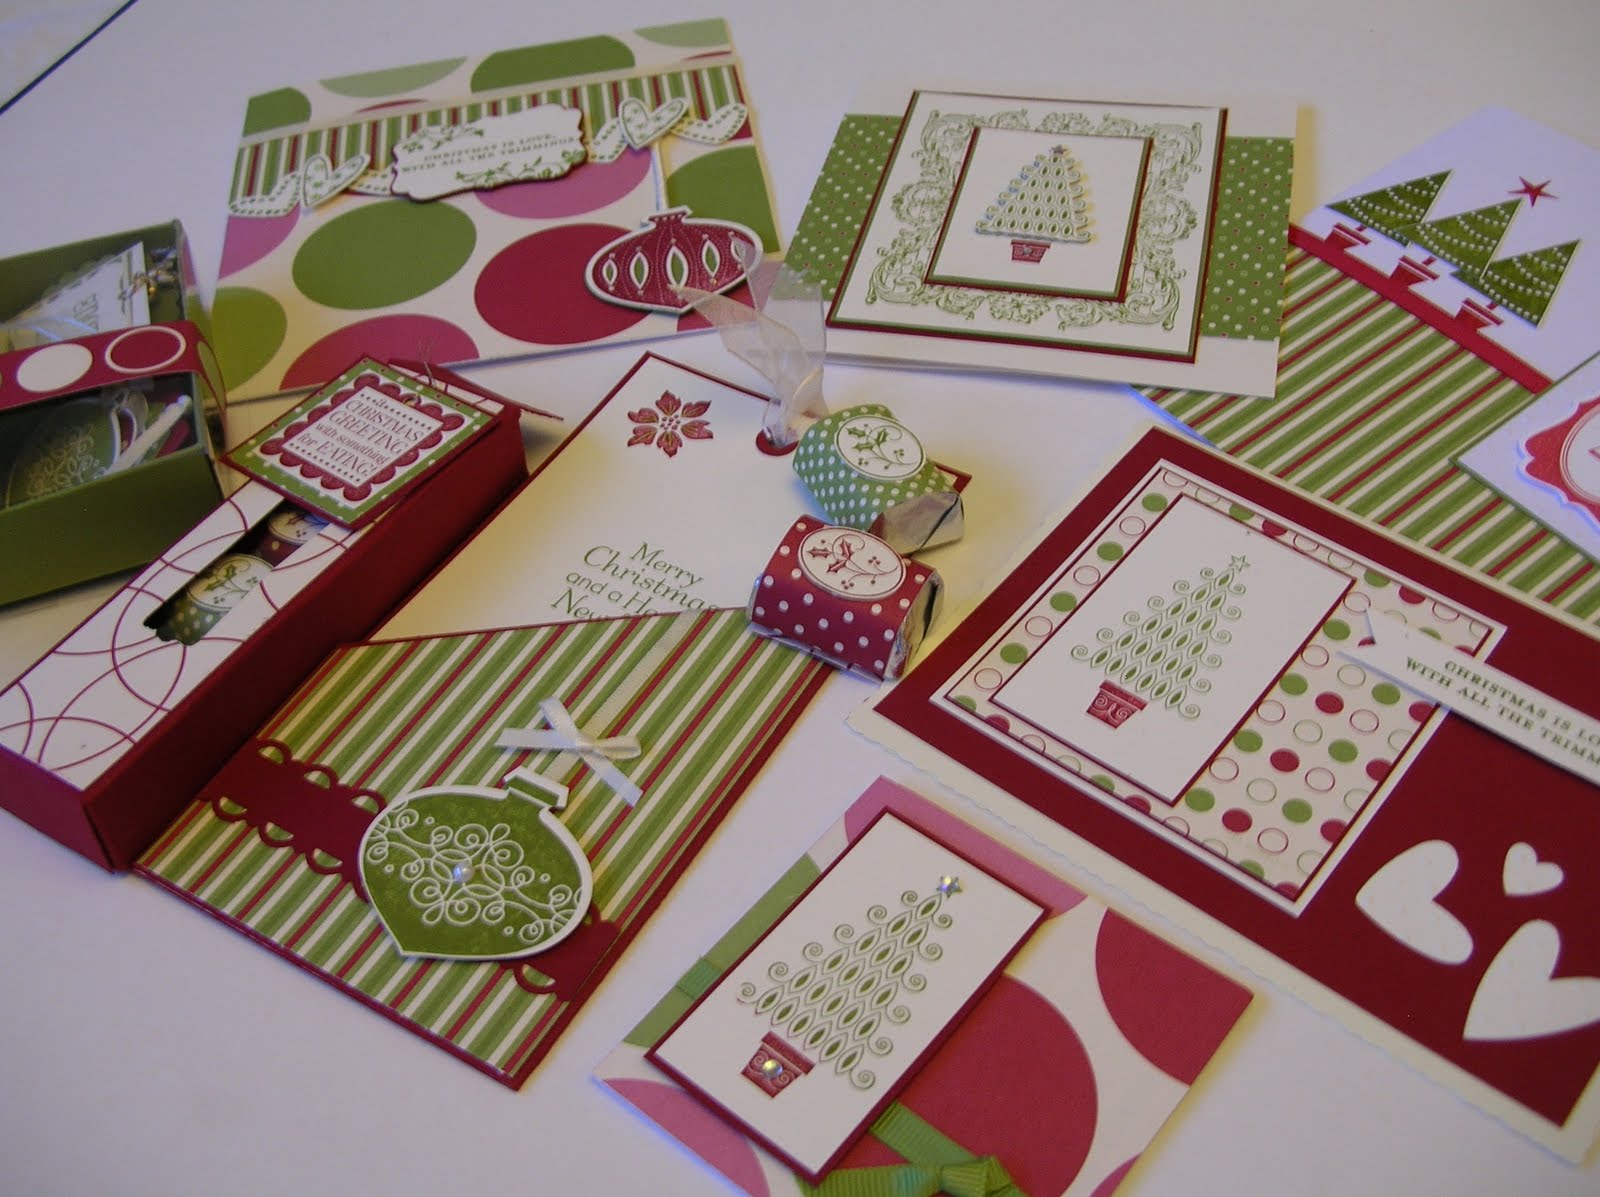
It has been a very exciting (and busy) weekend, so I apologise for the lateness in this posting. This weekend has seen the launch of the brand new 20-11-2012 Stampin' Up! catalogue on Saturday followed by my catalogue launch party on Sunday.

So, the eagerly awaited catalogue is now available for you to view online or purchase from me. Inside, there are


  • over 41 new stamp sets


  • lots of new roller stamps


  • an extended single stamp range


  • a new 'In-Colour' Collection


  • 14 new designer paper collections


  • and plethora of new punches, dies, embossing folders, ribbons, trims, fabrics, storage items and embellishments...

simply too much to list here is one go! I am so excited to bring you this new catalogue and hope you will enjoy seeing the many samples I will create with it over the coming months.


On top of that, there are new (and better) hostess rewards if you decide to book a party and an extra special offer if you decide to sign up as a demonstrator in the month of October. Please check out my links for further information or e-mail me to find out more.


I hosted my first catalogue launch party yesterday and due to the gorgeous Indian Summer weather, was able to present the entire event outside in the garden. We all had a lovely afternoon sipping refreshing 'lemon crush' and afternoon tea, enjoying homemade cupcakes and scones and exploring the new catalogue, along with some of the samples I had already made with the new products. Here are a few photos I took before everyone arrived.


Sunday 18 September 2011

Christmas in September?

Well, it was for 12 of us yesterday, as we spent a whole day immersed in red and green for a wonderful day of Christmas Stampin' Up! crafting.


Armed with the facts that it's now just 97 days left to Christmas (aghhh!) and the average person sends at about 49 Christmas cards (which is a lot if you make them), it seemed time to start our preparations and we spent the day making a big attack on our Christmas cardmaking.


Everyone received a fantastic kit of Jolly Holiday papers, Contempo Christmas stamps and plenty of card and trims to make all the 12 card projects, 3 other Christmas papercraft projects and much more at home.


It was a jam-packed day of festive fun too, with 'Christmas' treats for everyone who attended, Christmas decorations around the room, a tasty buffet, cakes and prizes to be won in the scavenger hunt and prize draw.


In fact, those who attended enjoyed themselves so much, they have asked for another Christmas workshop day before the big day, so if you missed this one and would like to join them for the next, please get in touch to find out more!


Here are just a few of the 15 lovely projects that were made on the day.


Monday 12 September 2011

Punching to new heights...


Back with my punches again this last week and I have so enjoyed creating this cheeky little chap, Griff the Giraffe!


He's a great way to get lots of use from oval and circle punches and is sure to make anyone smile.
It's a very exciting time being a Stampin' Up! demo at the moment. September means goodbye to many old favourites as the list of products that will be discontinued is released, in order to make room for all the new goodies being released in the brand new catalogue for 2011-2012. This is the last chance to get a whole range of wonderful goodies including the Designer paper packs, many different stamp sets and even punches, ribbon and embellishments. If you would like to see the full list, click here . Many of the items are reduced in price too, so it's a great chance to get something you have always wanted at a bargain price!
You can order these products before 30th September with me but remember stocks are limited and when they are gone, they really are gone!

Saturday 27 August 2011

One for the road!


I've been playing with my punches again, this weekend. It never ceases to amaze me just how versatile they can be! This cute vintage car makes a great card for any man or boy and is made quickly and simply with punches. The main Stampin' Up! punches you will need are:


1 3/4" x 7/8" Large Oval punch

1 3/8" x 5/8" Large Oval punch

Large and medium circles from the Two-step Owl punch

Word Window punch


Here is a basic tutorial:


Monday 8 August 2011

Feeling Sheepish?

I have been this weekend! I have making these delightful little 'Sian The Sheep' (a local Welsh sheep, of course!) card sets. Arn't they cute? Each box contains a set of four cards with envelopes and four matching gift tags.
To make your own, you will need the following Stampin' Up punches:
body: scallop circle extra large,
head: owl and cut off the feet,
hair: boho blossoms - the middle size flower,
legs: modern label and cut vertically into three bits use the centre for front legs and sides for back legs
eyes: Itty Bitty circle for the white part and use the small circles from your owl punch for the inner eyes.
The background is made using the Scallop Edge Border punch along green card and then sticking it onto a square of blue card.
Simple, quick and a great way to use up leftovers!


Monday 1 August 2011

Create Flowers of the Season


If you think of flowers in summer, you will probably think of roses and what better way is there of bringing some seasonal colour to your creativity, than by making these lovely fabric roses from seam binding ribbon. They will add a great dimension to your cards/layouts and when teamed with stamped images, give a very elegant look to your work. They are also extremely satisfying to make!


In the sample card, the roses have been teamed with stamped images using the Greenhouse Garden two-step stamps and the paper is from the Springtime Vintage collection.
If you'd like to have a go at making them, we will be making them in some of our Caerphilly cardmaking and scrapbooking workshops throughout August, so if you don't want to miss out, book your place now!
The seam binding ribbon is available in four gorgeous colours: Baja Breeze, Crumb Cake, Pear Pizzazz (pictured in my card) and Rose Red. here is the colour chart from the catalogue.


August Offer!


Place an £75 order or hold a £250 party in August and you will receive this fabulous gift for free!


You free gift includes an exclusive Stampin' Up! zip-up bag which is perfect for holding your craft tools/ink pads or even embellishments plus you also get a whole roll of Rich Razzleberry striped grosgrain ribbon and a 24-piece clips assortment included... so three freebies altogether!


To place your order, please contact me throughout August.

Monday 18 July 2011

Adding Shape To Easel Cards


I thought you might like to see these pretty shaped easel cards that I have been making with my Big Shot. By using the fantastic Scallop Circle and Top Note dies from Stampin' Up! you are able to create some really lovely shapes to work with. To make the Scallop Circle Easel card, I started with a folded 5"x5" square card base and placed it over the die, so that fold was inside the die shape. To make the Top Note shaped card, I started with a folded C6 card base and placed it inside the die shape before passing through the Big Shot.


Once they have die cut the base card, score one side of the card in half.


Then make a single die cut shape in the same design and stick it to the lower part of the fold.
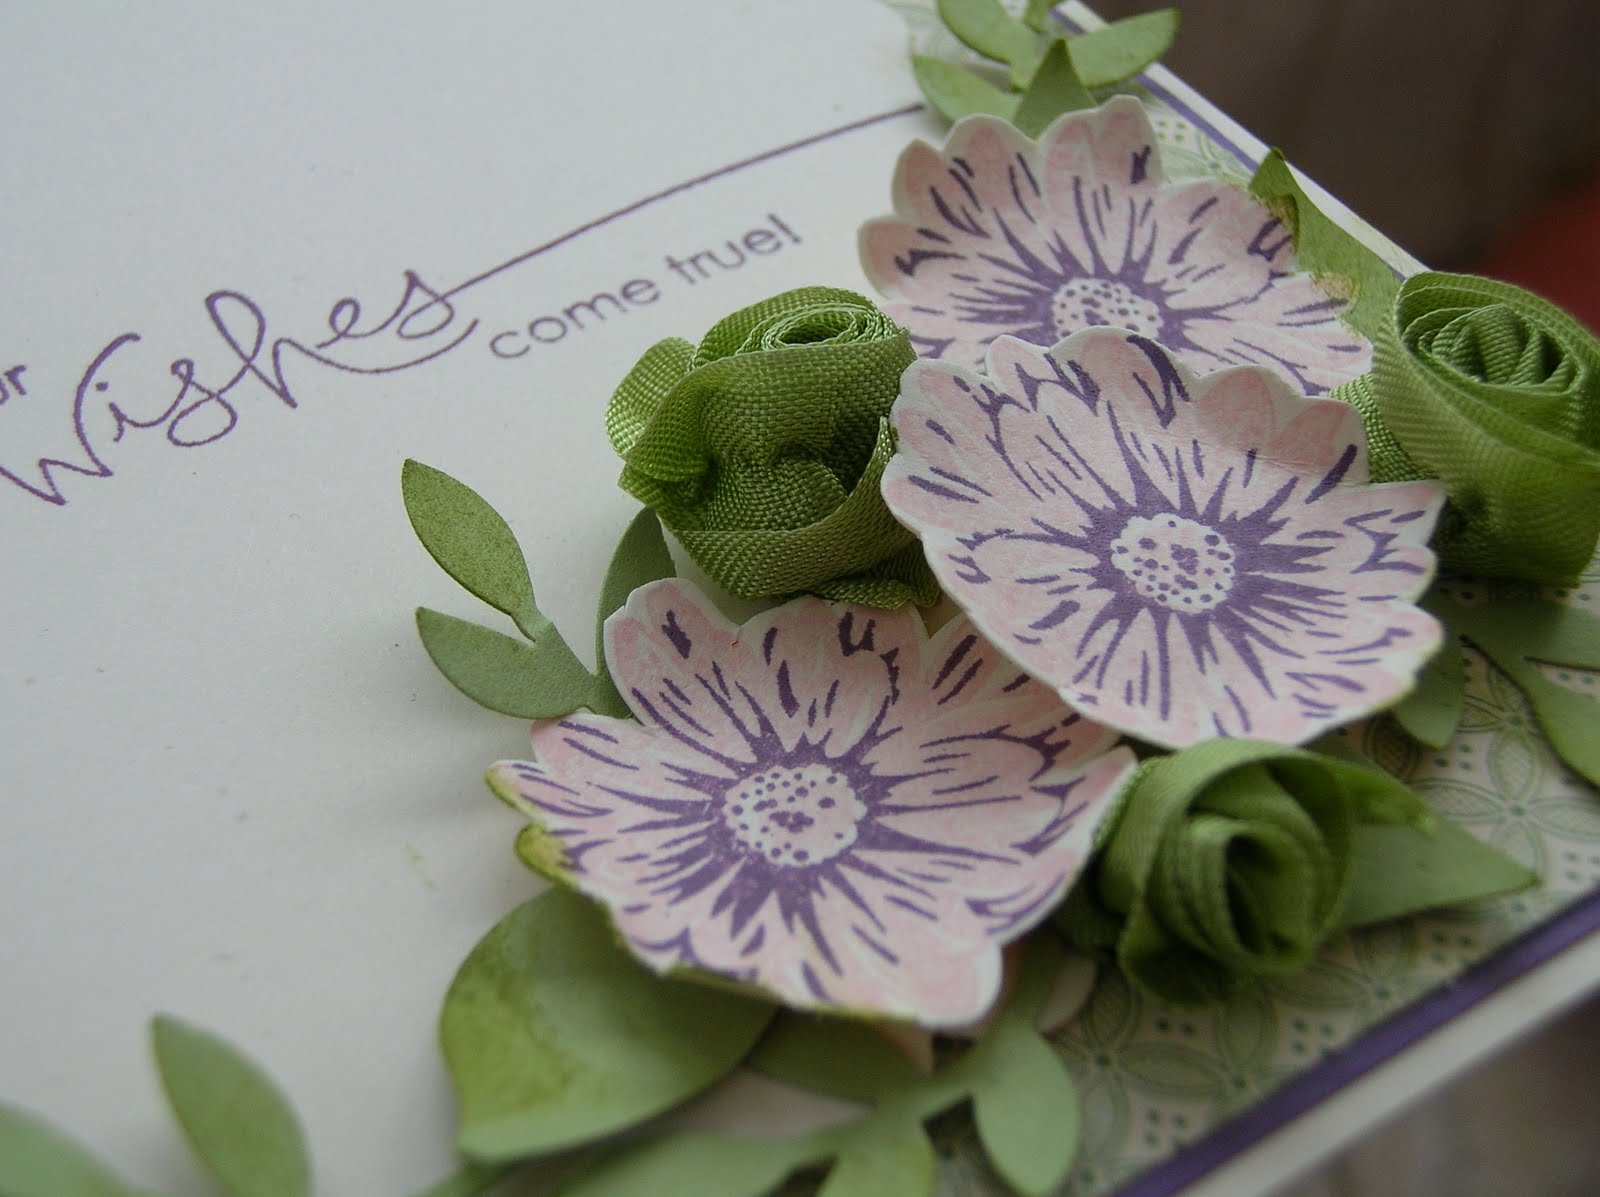
The best thing is, you can then die cut your patterned paper to cover it exactly with no extra cutting out by hand and it will fit perfectly! Here is a close up and more details of the two designs:
Made with Springtime Vintage papers and Nature Walk stamp setMade using Elegant Soiree papers and Vintage Vogue stamps.

Wednesday 6 July 2011

Bags of Fun!

Over the last week or so, I have been busy making lots of these lovely little bags (thanks Luan for the pattern!).


Each one is made from a sheet of A4 card and there is no cutting involved at all!


I think they are lovely and are such a versatile design that they can be used for so many things and in so many ways:


  • Put a handle of ribbon or card on to make it into a bag.


  • Leave a handle off, so that it is more like a box.


  • Use as a cover for a clear acetate bag of chocolates.


  • Use to gift wrap jewellery, mini bottles of toiletries or other gifts.


  • Fill with little matching notecards for a complete handmade set of cards.


We will be making one of these bags at the July cardmaking workshops in Caerphilly, so if you fancy having a go, you know where to come!

Thursday 16 June 2011

So Cute!

I have been having more fun with die-cuts today. Claire (my Stampin' Up! upline) sent me some die cuts using the new Mini Milk Carton Bigz L die, Beautiful Butterflies Bigz die and Beautiful Wings Embosslits die and I couldn't wait to get started on them. The milk carton are so cute and perfect for gifts like jewellery and choccies and the butterflies are so pretty and useful. I just love the swirl on the largest butterfly on the embosslits die. So elegant. I can now see them all appearing on my next order, thanks Claire!


Sunday 12 June 2011

Pretty Pillow Boxes

I've just received my new Stampin' Up! pillow box die and suddenly making boxes is so easy!

Decorating the boxes is a great way of using up leftovers and they are the perfect size for small gifts like choccies, jewellery and soap. This die will prove invaluable for my collection. I love it!

These pillow boxes have been made fom Marina Mist cardstock and leftovers are Springtime Vintage and Blueberry Crisp papers. I have decorated the boxed with Stampin' Up! punches.

Wednesday 1 June 2011

EXTRA, EXTRA, READ ALL ABOUT IT!

EXTRA HOSTESS REWARDS FOR JUNE AND JULY!

From 1 June until 31 July 2011, hostesses can earn an extra £20 to spend on Stampin' Up! products of their choice when they host a workshop of £250 or more. This is an extra reward to the usual fantastic hostess benefits, so if you have been thinking of holding a workshop, now is the time to give it a try!

If you want to take advantage of this fabulous but limited offer, contact me today to book a home workshop or party.

Wednesday 25 May 2011

Scrap Mad with Stampin' Up!

Last weekend, I held one of my popular Scrap Mad Days, so this week I thought I'd share some of the layouts that we did throughout the day. The whole day was based around a fabulous kit of Stampin' Up products including a Designer Series Paper Stack and matching cardstock pack.
The theme of the day was quick and adaptable scrapbook layouts and the ladies who attended were able to adapt my class projects with their packs by swopping their papers to different colours and patterns, in order to suit their photos.


We had some wonderful results and although they were the same layouts, they all looked so different in the different colours and patterns. Everyone agreed it was a great day and I look forward to bringing another Scrap Mad Day to Caerphilly soon.


On The Rocks: was a total die-cutting fest, using all my new Stampin' Up Big Shot dies to great effect. In this layout I used the Scallop Circle, Fun Flowers, Little Leaves and Sweet Buttons embosslits dies and the Perfect Plum, Certainly Celery and Bashful Blue papers/card from the Subtles Designer Series block. So quick to do and beautiful results!

Once Upon A Time: On this layout I used the pretty Flight of the Butterfly stamp set and the Top Note and Scallop Circle dies, together with the scallop border punch. Colours are So Saffron, Marina Mist and Bashful Blue from Subtles Collection.


More layouts in my Scrapbooking Gallery.

Monday 9 May 2011

Win Sets of Stamps All Through May!


Just visit the main Stampin' Up site through the link below and you could win a fabulous set of stamps by just answering a simple survey question! And you can go back every Monday this month and have another go too, so there's more than one chance to win! You've got nothing to loose. Click here for the main Stampin' Up site.

Wednesday 27 April 2011

Stampin' Around The Page

I was tidying up my craft room today and came across my brand new, unopened and unused wheel guide for the Stampin' Around stamping wheels. I've been waiting for some time to play with it and then it got lost under the mess and forgotten, so having found it again, I just had to give it a go...


I've got to say, I'm thrilled with the results and it was really easy to do and I can't wait to do some more. It even inspired me into doing some scrapbooking again (it's been a while since I scrapbooked just for the fun of it!) so that was good too!


Why not have a look around your craft room to see what you haven't used before or for a long time and see what inspired you?


For this layout I used the Jumbo Whimsy wheel and the Dotted Lines wheel for the journaling block. The layout also gave me a chance to use my new Little Leaves Sizzlits die with the Big Shot, my new Itty Bitty flower punch and the Heart to Heart punch.

Sunny Garden

This wonderful weather has inspired me to look out my pretty Sunny Garden papers. I love the cheerful designs of this collection and as I'm currently enjoying the sunshine in my own garden, I came up with this card which fits right with my mood.

I also used:
Poppy Parade, Old Olive and Daffodil Yellow cardstock;
Eyelet Border, Boho Blossoms, Large Oval, Scallop Oval and Two-Step Bird punches;
stamps from the Oval All and Punch Pot Pourri sets.


Monday 11 April 2011

Blue Monday

Digging further into my Springtime Vintage paper collection, I discovered these lovely blue floral papers. Depending on what you use with them, you can make them look really vintagey or crisp and modern. For the 'Friend To Friend' card: here's what I used:

  • Fancy Flower punch

  • Five Petal Flower punch

  • Little Leaves Sizzlits Die

  • Decorative Label punch

  • Eyelet Border punch

  • Not Quite Navy cardstock

  • Four Frames stamp set

  • Friend to Friend stamp from Love You Much set
  • For the 'Thanks' card, here is what I used:


    • Itty Bitty Bits stamp set

    • Itty Bitty Shapes Punch Pack

    • Decorative Label punch

    • Thanks stamp from Afterthoughts set

    • Not Quite Navy cardstock

    Thanks for looking!


    Ness x

    Springtime Is Here!


    The trees are getting greener, the tulips are out and we have had the most glorious start to April, so what better way to get some spring spirit than by indulging in the new Springtime Vintage papers from Stampin' Up.


    This pretty collection of papers will take you all the way into summer with pretty florals, stripes and prints. I have teamed them with:


    • Pear Pizzazz and Very Vanilla cardstock


    • Rose Red and Pear Pizzazz inks


    • curly frame stamp from the Baby Blossoms stamp set


    • dotty frame stamp from the Four Frames stamp set.


    The butterfly was made using the butterfly stamp (Salebrations Pot Pourri set) or you could use any butterfly from the Butterfly Prints set.


    Thanks for looking!


    Ness x

    Tuesday 5 April 2011

    Bloomin' Great Blossoms


    I just had to show you this pretty card that I made for my mum for Mothers' Day, using the new Baby Blossoms, two-step stamping set. Isn't it very Cath Kidson?


    I have only just discovered two step stamping with Stampin' Up and it's just so easy! It makes your stamping look so professional and much more three-dimensional.


    Here's how you do it:

    1] Stamp the base image.

    2] Position and stamp the overlay or adjoining image. TIP: Use lighter ink for the base image and darker ink for the overlying image.


    Yes, that easy!!! No masking, no possible ink in the wrong place... brilliant!


    This card using the Baby Blossoms stamp set but others sets that are designed for two-step stamping include: Simply Said, Greenhouse Gala, A Good Egg, Make A Monster and many more. Inks used in the sample are: Pretty In Pink, Rose red and Wild Wasabi (all from Subtles colour collection).


    Thanks for looking!

    Ness x

    Saturday 2 April 2011

    MONOCHROMATIC CLASSICS Stampin' Up!'s Core Colour Collection is simply the most versatile selection of products that make gorgeous and stylish projects quickly and effortlessly, just when you need them!

    All you need to make the following cards is any colour or pattern paper from one of the Patterns Designer Series Paper Stacks, a sheet of matching card, a matching ink pad and whisper white card plus a few wonderful Stampin' Up stamps and punches.
    Lots Of Hearts Card -sample in Perfect Plum from Subtles collection. You will also need: Hearts stamp from Love You Much set, Greeting stamp from Heard From The Heart set Heart to Heart punch, A border punch.


    • Make a 6" square card from Whisper White cardstock.


    • Cut a square of patterned paper approx. 13cm square.


    • Mount onto whisper white card and trim to leave a narrow border around.


    • Mount onto matching cardstock and trim to leave a narrow border around.


    • Onto whisper white card, stamp greeting of choice in matching ink.


    • Trim into a strip and then punch both sides with a border punch.


    • Stick into position down centre of background mount.


    • Trim off excess and stick onto a 6" square base card.


    • Onto Whisper White cardstock, stamp hearts twice using matching ink.


    • Punch out using Heart to Heart punch and stick into position on card.


    Love Heart Card - sample in Melon Mambo from Brights collection


    You will also need: Large Heart and Love stamps from Love You Much stamp set, Basic Pearls, A border punch.


    • Make a 6" square card from Whisper White cardstock.


    • Cut two strip of patterned paper in different patterns but the same colour to approx. 2.5" wide and 5" long.


    • Punch the ends of one strip with a border punch. Stick into position.


    • Stamp Love You Much stamp in space between the l-shape, in matching ink.


    • Stamp large Heart stamp on white card and cut out. Stick in position.


    • Add gems.


    Stampin' Up!'s Colour Core Collection includes Designer Series Paper Stacks, Cardstock packs, ribbons, ink pads, inks and markers - all in a wonderful series of colours that match perfectly for a totally professional finish! To order these products, contact me.

    Friday 1 April 2011

    Order Now From New Mini Catalogue!

    The new mini catalogue is packed full of some gorgeous new Stampin' Up! products. First on my own list was the cute Owl punch, the Decorative Labels stamp set and matching punch and these cutest Itty bitty Stamp Set, you've ever seen! The first of my sample projects will be appearing here shortly.